Changelog
Follow up on the latest improvements and updates.
RSS
new
Storefront
Storefront Release Notes for 2026.2
Storefront 2026.2 introduces major enhancements for B2B commerce, customer personalization, merchandising flexibility, and performance. This release delivers a more collaborative quoting experience, smarter customer-specific controls, and a wide range of platform improvements across storefront and admin.
Quotes, End-to-End
Quoting is now fully integrated across both storefront and admin, making it easier for buyers and sales teams to collaborate without leaving the platform.
- Create Quotes directly from the shopping cart to turn active carts into formal quote requests
- Create Quotes from Wishlist for faster saved-item conversions
- New My Account Quotes section gives customers visibility into all quote activity
- Customers can edit and resubmit quotes directly from My Account
- Admin Edit Quote functionality enables sales teams to review, modify, approve, and respond to quotes from the back office
For a full walkthrough, check out the knowledge base article here: https://support.americommerce.com/hc/en-us/articles/48520103673755-Creating-and-Managing-Front-End-Quotes
Smarter B2B & Customer Experiences
Deliver more tailored buying experiences with expanded customer-type controls and personalization options.
- Customer-Type Specific Minimum Order Amounts for retail, wholesale, distributor, and custom customer groups
- Storefront personalization visibility controls by store and customer type
- Reset Password URL support for customer SSO flows, allowing account recovery without interrupting single sign-on authentication
Better Merchandising & Product Management
New merchandising tools make product setup, pricing configuration, and product discovery more flexible.
- Clone Price Calculators from existing configurations to accelerate setup
- Manufacturer and Category support within Price Calculators for more advanced pricing logic
- Custom Fields for Variants to support extended product data
- Additional variant inventory options for more customized information
- Product search improvements prioritize SKU and product-name prefix matches for more accurate results
- Slideshow Widget Play/Pause controls for improved storefront media interaction
- Avalara Tax refund support for improved tax reconciliation workflows
Security, Speed & Performance
We’ve introduced a range of storefront improvements focused on performance, consistency, and accessibility
- Performance improvements across Category, Search, Attribute, and Widget pages, along with additional backend optimizations
- Faster, higher-quality image resizing with improved cross-format consistency
- Expanded storefront accessibility improvements
- Fixed an issue affecting USPS Ground Advantage rating calculations
new
Storefront
Storefront Release Notes for 2026.1
We’re excited to announce a powerful new release packed with enhancements designed to make your experience
simpler, faster, and more flexible
- whether you’re managing B2B customers, running reports, or optimizing day-to-day operations.Smarter B2B & Customer Experiences
Managing teams and accounts just got easier. Our enhanced
B2B portal
now gives store more control including:• Expanded
manager permissions
to allow reassignment of employees• Employees can now
associate themselves with a manager
• New setting allowing employees to
use their manager’s store location
Customers will enjoy a more convenient experience with:
•
Reward points displayed as dollar values
for clearer savings• A new
guest gift card balance lookup
•
Payment links
directly on customer order list and statements pageBetter Merchandising & Product Management
We’ve added tools to help you move faster and sell smarter:
•
Clone products
wizard to help you quickly build or expand your catalog• More powerful
price calculator rules
, now including manufacturer and primary category• Personalization options that can be
hidden by store or customer type
• Improved phone number formatting including country code
Deeper Insights & Reporting
Make better decisions with clearer data:
• Run a
Zero Sales Report
to spot missed opportunities•
Email delivery reports
for more insights • Track
inventory sold
for improved inventory planningSecurity, Speed & Performance Improvements
Behind the scenes, we’ve made major upgrades to keep your platform fast and secure:
• New
Content Security Policy (CSP)
configuration options• Faster admin performance, even with large numbers of stores
• Improved product search speed
• Optimized loading with preconnected and preloaded JavaScript and CSS to boost Core Web Vitals
More Powerful Integrations:
•
Zip Tax
integration added•
Avalara Tax and TaxCloud
can be configured to commit tax based on paid and order status•
Network Merchants
payment gateway now supports ACH•
QuickBooks Online
enhancements, including:- Deposit account support
- Invoice class syncing
- Taxes synced as line item
• Improved
Fishbowl integration
to sync order with prefixQuality Improvements & Bug Fixes
We’ve also addressed a wide range of fixes and usability improvements, including:
• Improved discount sorting and filtering by date and status
• Store location import/export support
• View-only customer type
• Configurable refund reason ordering
• Rule engine support for customer external numbers
• Automatic ad-code expiration controls
• A new “like” button to product display widget
• Improved variant handling for pricing and images
• Resolved caching issues on product and carousel displays
• Fixed cart layout issues when removing items
new
improved
Marketplace Management
MCM Release Notes 2H 2025
Buy Box & Competitive Pricing
- Track Buy Box Win/Loss History: Clients now have insight into historical buy box status over time. This feature improves client visibility into the repricing changes that gain or lose the buybox.

- Improved Algorithmic Pricing Strategy: Better results when you have multiple offers for the same ASIN (e.g., selling both FBA and FBM simultaneously, or selling multiple conditions of the same ASIN)
- Pricing Health–Based Buy Box Safeguards: Improved Buy Box pricing behavior when no general competition exists, using Amazon pricing health data such as Amazon’s competitive price threshold, average selling prices and MSRP to avoid listing suppression.
Amazon Listing Protection & Monitoring
- Enhanced Content Change Report: Now includes attribute and image changes, making it much easier to see exactly what has changed on your Amazon listings.

Listing Management Enhancements
- Skupane UI Improvements: Auto-expand repricing details panel while adding a link to edit the assigned pricing strategy, reducing the number of clicks to edit a variety of data points across channels

- Product Export/Import Enhancements: Better list support (user-friendly dropdown values)
- Amazon Listing API Migration: Migrated Amazon marketplaces to the modern Listing Items API, improving reliability for price, quantity, and offer-only publication.
- Stronger Listing Validation & Error Feedback: Improved validation and error messaging for missing or invalid ASINs, UPCs, EANs, GTINs, and conditional required fields (e.g., variation parents).
Cart Logistics (Jazz) + Fulfil.io Integration Enhancements
Brand New Integration:
We recently built a new integration to Fulfil.io, a popular ERP for DTC Brands. These features and improvements are available for customers using our Cart Logistics (Jazz) integration with Fulfil.io- Bundle/Kit Preference Settings: Configure whether kits or components appear as order line items
- Lot Number Tracking: Send/receive lot information in inventory transactions and shipments (with toggle to disable)
- PO Number Support: Import order references from Fulfil.io as PO numbers to Jazz
- Source Order ID Mapping: Choose what Order ID maps to the Jazz order number (MCM Order ID vs Seller Order ID)
- ASN Receipt Marking: Automatically mark ASNs as received in Fulfil when Jazz receives them
- LTL Shipment Consolidation: Consolidate LTL shipments by bill of lading
- Customs Information Mapping: Map customs information from Fulfil products to product properties
- Shipment Cancellation Sync: Cancel Fulfil shipments when cancelled in Jazz
- Automatic Product / SKU Creation in Jazz: Clients can now choose to enable a setting to automatically create products in Jazz
- Improved Order Resync & Cancellation Reliability: Enhanced handling for resending cancelled orders and keeping order/shipment state in sync between Jazz and Fulfil.
Workspaces
- Filter Builder: We have introduced an enhanced filter tool in both the Product and Listing workspaces. Filters are now easier to manage as you build custom filters


Reports & Analytics
- Report UI/UX Improvements: Enhanced usability across Profit by Product, Profit by Channel, and Buy Box Reports
- Sales Rank Column: Added to Listings Workspace and Low Stock Report for better inventory decisions
- Days of Stock Filtering: Improved to allow more robust filtering operations
- Buy Box & Profit Report Accuracy Improvements: Resolved inconsistencies in Buy Box and profit reporting when multiple offers or fulfillment types exist for the same ASIN.
- Report Performance & Stability Enhancements: Backend performance improvements for large reports, reducing load times and failures for high-volume sellers.
Channel Integration Updates
- Walmart OmniSpec v5 Listing Publishing: Removed legacy v4 item feeds and migrated to Walmart’s v5 item spec feed
- TikTok Shop Token Refresh Implementation: Automatic API tokens now refresh when they expire
- Fixed Buy Box Disqualification Warnings: Resolved false positives where listings showed warnings despite winning the buy box
- BigCommerce Inventory Webhooks: Added backend support for real-time inventory webhooks, reducing reliance on polling and enabling faster inventory updates.
new
Storefront
Storefront Release Notes for 2025.3
We’ve been busy improving your experience! This update introduces exciting new features, smoother integrations, and a variety of enhancements to make managing your store easier than ever.
✨ New Features
•
Track Your Email Delivery Status
– We’ve added powerful new insights to help you understand how your emails are performing! You can now see detailed delivery statuses for emails sent to your customers — including whether an email was:- Delivered – Successfully reached your customer’s inbox
- Opened – Opened by your customer
- Bounced – Could not be delivered
- Marked as Spam – Flagged by the recipient’s email system
You can view email delivery insights in three places:
- Email Templates Page: See the overall delivery status across all your email templates.
- Individual Email Template Page: Track how each template is performing.

- Customer Email History Page: View delivery and engagement status for every email sent to a specific customer.

•
Automatic Reward Points and Gift Certificates
– Easily send reward points and gift certificates to customers based on your rules or promotions. This rules can automatically apply to customers based on whatever frequency you deem fit (days, months, years) and can be segmented by Store and Customer Type. No more complex rule engine actions! 
•
Category-Specific Gift Certificates
– Limit gift certificates to selected product categories for more targeted rewards.
•
Generate Gift Certificates for Multiple Customers
– Generated and assign gift certificates to multiple customers in one step.•
Upsell Discounts
– Offer percentage-based discounts on upsell products.
•
Nuvei ACH Payments
– Nuvei payment gateway now supports ACH payments for added convenience.•
Store Testimonials
– Upload multiple images per testimonial to showcase more customer stories.•
Back-in-Stock Alerts
– Automatically notify customers when back-ordered products return.•
SFTP Exports
– Scheduled exports now support custom ports for easier setup.🔗 Integration Updates
•
FedEx Ground Economy
– Added support for FedEx Ground Economy (formerly SmartPost).•
CyberSource
– Updated to the latest API for better performance and reliability.•
Amazon SMS (MFA)
– Added support for Amazon’s SMS service for customer two-factor authentication.•
Klaviyo
– You can now send resized images in marketing emails for faster load times.•
Signifyd
– Fraud protection now supports store pickup orders.•
QuickBooks Online
– Choose whether to sync orders as invoices or sales receipts on a per-order basis.🛠️ Fixes & Enhancements
• Refund reward points applied as discounts when order is canceled.
• Customers can now purchase subscriptions while registering during checkout.
• Improved Quick Order performance.
• Resolved several minor issues with the HTML editor.
• Fixed custom payments not showing correctly in the order editor.
• Added order salesperson and due date to the order list and import/export.
• Fixed increase/decrease quantity issue in cart when use multiple-quantity feature.
• Resolved issue with child items inactive by store and customer type.
• Fixed order balance updates when process payment order.
Updates
- We've updated our Amazon publication method to now include all of the latest required properties. This will reduce publication errors when listing to the marketplace.
- The Product Content Change Report now detects changes for a listing Product Type. Amazon will periodically update listings without warning. This affects the categorization of your product. Select "Product Type" as the attribute filter within the report to view the latest changes.

- There are new referral fees for Walmart in accordance with their latest item spec. The updated fees will be used in cost values for repricing as well as order fees. Check out the latest fees on their website.
- Amazon and Ebay fees have been updated as well - Amazon Premium Experience fees and Ebay marginal fees are now stored in our system and used for repricing and order costs.
- Your Amazon listing status will now update to Channel Warning if we receive a notification that your offer has been disqualified from winning the Buy Box. This occurs when your pricing is not competitive. To resolve, adjust pricing based on the competitive price threshold or other markers like Average Selling Price.

- The Issue Summary Report email now includes updates on listings that are suppressed and need attention to resolve their status.
- Our Low Stock Report now has a column to identify whether or not the SKU is a bundle, component, or neither. This addition will give more context to the quantity and sales columns.
- We now support publishing bundles to TikTok. This will work the same way as other marketplace bundle publication, where the available bundle amount is sent for the SKU's quantity value. TikTok orders for the bundle will decrement quantity from all components.
Bugs
- We've fixed a bug where variation relationships were not being published to Walmart. Now sets will be published together under a parent SKU.
- Bundles were previously not being published to Shopify with the correct available quantity amount. Now the lowest component quantity value will be sent for the bundle inventory level.
- Tags that were not used on any products were previously showing up in the tag column filter. This has now been resolved, allowing for a cleaner experience when searching for tags.
new
Storefront
Release Notes for 2025.2
We’re excited to share the latest updates packed with powerful new features, performance enhancements, and new integrations to improve your workflow and customer experience.
NEW FEATURES
New Personalization Options:
We’ve expanded our personalization features to give you more flexibility when configuring your products. You can now choose from the following input types: Textbox, Textbox with Confirmation, Upload, Dropdown, Phone Number, Data Picker, and Email Address. These new options make it easier to tailor your product experience for your customers’ needs.

Email Tracking in Customer Email History
We’ve enhanced email tracking to keep you better informed. Now, whenever an email is delivered, bounced, or opened, the status will automatically update in the customer’s email history—giving you clearer visibility into communication activity.

B2B Portal Enhancements
We’ve made several updates to improve your experience and streamline management tasks:
- Reward Points Management:Managers can now directly add or remove reward points for employees.
- Enhanced Reporting:Product status is now included in both the Company Reports and Product Inventory Report.
- Order Approval Simplified:Managers can now approve entire orders or item by item directly from the My Account section.
Smarter Shipping Estimates with Geo Location
You can now estimate shipping costs using the visitor’s
Geo location based on their IP address
—available on both the Shopping Cart and Estimate Shipping pages. We’ve introduced new merge codes for visitor’s Geo location data:
- ##SESSIONCOUNTRY##
- ##SESSIONSTATE##
- ##SESSIONCITY##
- ##SESSIONPOSTALCODE##
These enhancements help provide more accurate shipping estimates with less effort from your customers.

FEATURE IMPROVEMENTS
We’ve rolled out several enhancements to improve performance, usability, and flexibility across the platform:
Shipping Provider API Updates
Updated FedEx, UPS, and USPS integrations to the latest API versions for improved reliability and compatibility.
HTML Editor Upgrade
Our HTML editor now includes the latest improvements for a smoother and more powerful editing experience.
Widget Scheduling
You can now schedule widgets to display on specific dates—perfect for time-sensitive promotions or seasonal content.
"Notify Me" on Category Pages
The "Notify Me When Back in Stock" feature is now available directly on category pages for easier access.
Inherited Products into Subcategories
New option to automatically display products from a parent category in all its subcategories.
Low Stock Notification Settings
Configure low stock alerts to trigger only once when inventory drops below your defined threshold.
Saved Search Text on Apps & Add-ons Page
Your last search term is now saved, helping you find apps and add-ons faster.
Customer Saved Carts in Admin
View customers’ saved carts directly from the Admin > Orders > Carts page for better insight and support.
NEW INTEGRATIONS
Fishbowl Inventory

We’re excited to introduce Fishbowl Advanced Inventory Integration to automate your inventory workflows, helping you streamline operations and improve accuracy.
With this integration, you can:
- Sync orders seamlessly from your Storefront to Fishbowl.
- Sync inventory and shipment data from Fishbowl back to your Storefront.
Dillon Gage Integration

We’ve added support for Dillon Gage, a leading precious metals trading platform, to streamline your operations:
- Sync Products: Import products directly from Dillon Gage to your storefront.
- Real-Time Pricing: Automatically check live pricing from Dillon Gage when customers place orders.
- Order Sync: Send orders from your storefront to Dillon Gage after checkout.
- Status & Tracking Updates: Sync order statuses and tracking numbers from Dillon Gage back to your storefront.
This integration ensures accurate pricing, efficient order handling, and seamless communication between your storefront and Dillon Gage.
BUG FIXES
- Fixed an issue where changing quantity in the mini cart caused the shopping cart to close unexpectedly.
- Resolved a bug with decreasing item quantity in the cart when quantity multiples were enabled.
- Corrected UPS SurePost rate calculation for carts under 1 lb.
- Fixed an issue where the variant MSRP price didn’t update on the catalog page when switching variants.
- Addressed a personalization issue with child items when adding kits to the cart.
- Resolved a bug where Apple Pay occasionally failed to populate the state field.
- Fixed the product display widget not updating with the correct variant image and price.
- Corrected a reward points refund issue.
- Fixed a discount bug related to “Category in Cart Including Subcategories.”
- Resolved an issue where personalization strings containing the | character caused errors.
We heard you loud and clear—geolocation-based traffic blocking is here! This highly requested feature gives you even more control over your storefront, letting you fine-tune who can access your site based on region.
Now, you can easily set up traffic firewall rules to block visitors from specific locations right from your admin. Whether you need to keep certain regions out for security, compliance, or business reasons, we’ve made it simple.
Where to Find It: Settings > Security > Traffic Firewall

What’s New?
- Block by Geo Location– Set rules to block traffic from specific regions.
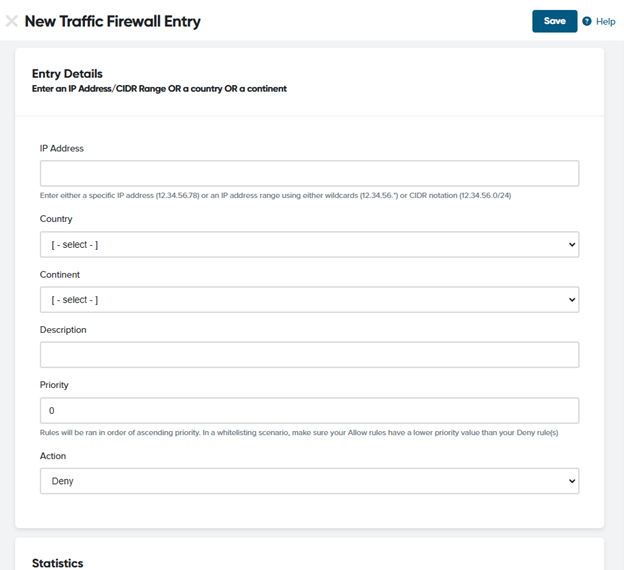
- IP Blacklist– Block individual IPs or entire ranges using wildcards.
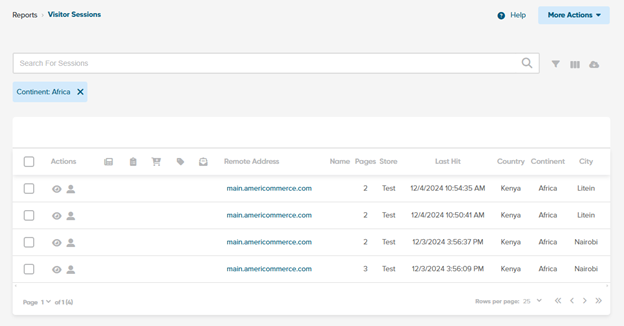
- Geolocation Insights– Visitor geo info is now saved in the visitor’s session and fully searchable. Go toReports > Visitors Session.

- Dashboard Updates– New widgets to track top countries, top continents, and top cities for deeper traffic insights have been added to the Traffic tab in the dashboard.

- One-Click Blocking– Quickly block regions or visitors directly from the visitor sessions list or active countries list.
Visitors Session:

Active Countries:

- Enhanced Filtering & Searching– Easily manage and monitor blocked traffic in the traffic firewall page (traffic blacklist).

This update puts more power in your hands, making it easier to secure and optimize your store’s traffic. Whether you’re preventing fraud, managing regional restrictions, or simply fine-tuning your audience, this feature gives you the flexibility you need.
For a full walkthrough, check out the knowledge base article here: https://support.americommerce.com/hc/en-us/articles/34566940226971-Review-and-Block-Traffic-by-Country
If you’re ready to take control, head to
Settings > Security > Traffic Firewall
to set up your geo-blocking rules now!We’re starting the year strong with powerful new features and game-changing improvements. Customize your dashboard with new widgets, streamline B2B payments and orders, enhance search with Algolia, and take advantage of the Salesforce integration. Plus, we’ve boosted security, refined order management, and made your storefront even better!
NEW FEATURES
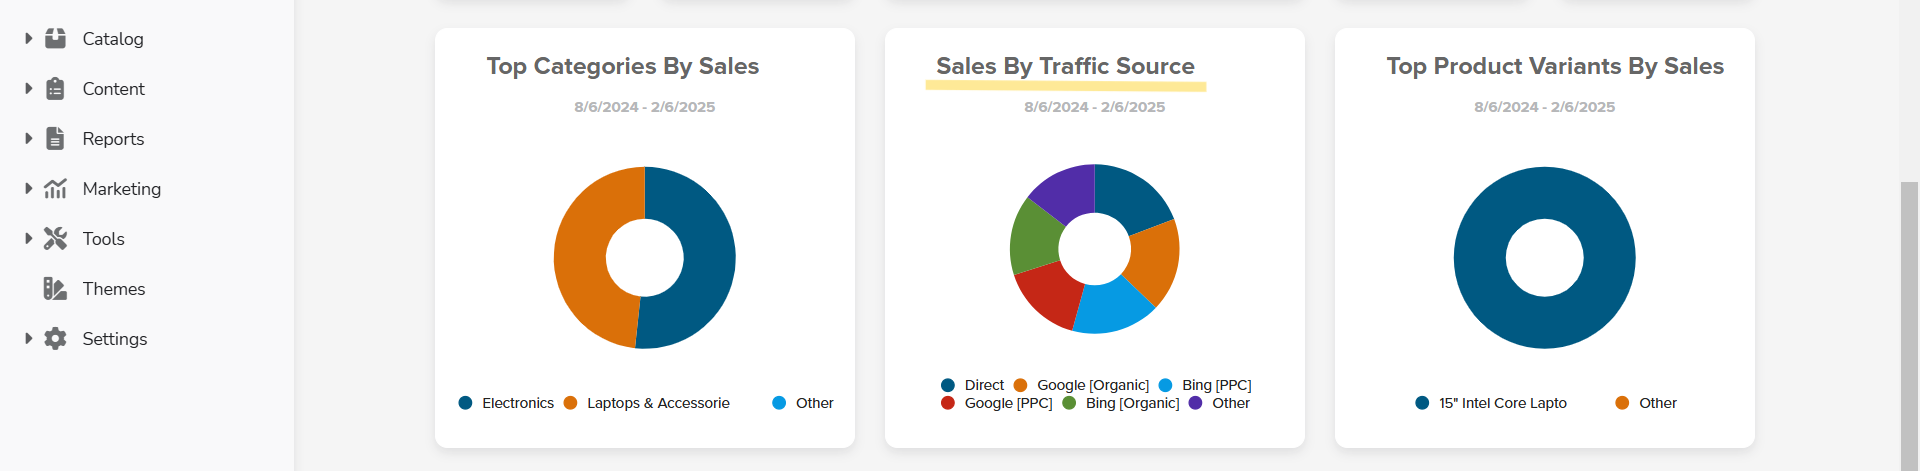
New Dashboard Widgets:
Check out our new dashboard widgets, making all your key metrics super easy to access. Using the drop-down menu, you can smoothly switch between dashboards like Sales, Traffic, Marketing, or Products—where you’ll find everything from your top-selling products and sales trends to revenue breakdowns and shipping insights.
You’ll also have the flexibility to customize your dashboard by toggling between detailed traffic analytics, store sales overviews, rewards status, and top page views. Plus, with the widget selector, it’s simple to add or remove widgets to create the dashboard that fits just right. It’s a straightforward, user-friendly way to stay on top of your metrics and drive your business forward.
Below, we’ve provided some additional details on select widgets to help maximize your dashboard’s potential.
- Top Products Widget:We’ve added a new Top Products widget that highlights your top 5 best-selling items at a glance in the Products tab.

- Store Sales Overview:Easily track your sales from today, this week, or even the past few years; all in one place.

- Sales by Traffic Source Widget:You can easily track where your sales are coming from through the sales tab.
- Page Views Widget:Check out the new top Page Views widget under the Traffic tab in your dashboard.

- Top Shipping Methods:The top Shipping Methods widget is now available under the Shipping tab in your dashboard. Easily see your most-used shipping methods to streamline your fulfillment process.
- Rewards Point Overview:In the Rewards tab of your dashboard, you can quickly check expiring points, points earned this month, total products purchased with points, and more.

B2B Portal:
We've rolled out some cool updates to our B2B Portal that make it easier for everyone to stay in the loop and handle payments. These changes are all about making teamwork smoother and more laid back while keeping things running efficiently.
- Order Email Copy Settings:Now you can automatically send company copies of all order emails, keeping your entire team informed of every transaction. Plus, administrators now receive copies of every order emails as well.

- Shared Credit Cards:We've added a new setting for shared company credit cards. Now, employees can choose from the company’s credit cards during checkout, while admins can add, delete, or update these credit cards.
- Custom Field Enhancements:Easily add and edit custom fields for agent and employee profiles. Plus, we've made it possible to mark specific customer custom fields as editable.
- Employee Reward History:Click on an employee’s profile from either the user manager or company page, and you'll instantly see their complete reward point history right on the front end.

- Employee Default Customer Type:We set a default customer type for employee accounts on the B2B portal.
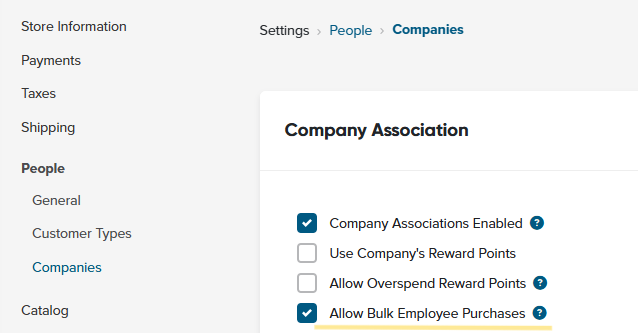
Bulk Ordering on behalf of Employees:
We've refreshed the PDP with a cool new drop-down that pulls Employee IDs from your customer hierarchy, so when you tag items, they're linked to the right person. Plus, you can easily toggle the bulk purchase feature on or off to suit your team's needs.
- Employee Custom Fields on PDP:We've made it easier to order on behalf of your team—now when you select an employee on the product page, their custom details (like sizing info) load automatically.

- Employee Selection on Order Edit:We've updated our order editor to update employee selection on order item.
- Employee Order Selections:We've refreshed our B2B portal so that when available, employee selections for individual order items now show up right in your order list, making order management smoother.
- Employee Order Reports:Filter and generate order reports for specific employees, with admin printouts now automatically grouping employee-tagged items together for easier tracking.
- Streamlined Order Emails:We've upgraded our order emails to automatically group items by employee ID, and now you can easily send emails just for a specific employee using our new admin tool.
- Employee Edit:Edit employee details on the shipping cart and wish list pages.
- Employee Selection:Choose an employee when moving items from your wish list to your cart.
- Share Your Wishlist with Your Team:Easily share your wish list with any sub-account in your company's hierarchy, so everyone stays on the same page.
- Accounts For Browsing & Wish List’s:You can create account types allowing users to browse and build wish lists without placing orders, perfect for customers who prefer to just explore.
Salesforce - Quote to Opportunity Integration:
- Sync New Quote:We've streamlined things so that every quote created on Cart.com now effortlessly transforms into a Salesforce opportunity. Complete with line items and status mappings for a smooth, one-way sync from your storefront to Salesforce.

- Quote Update:When quotes are updated in Cart.com, we automatically update your opportunities in Salesforce, including shipping details, fees, line items, and quote statuses.
- Covert To Order:When quotes turn into orders (whether on the front-end or backend), they automatically update to accept and link with their related opportunities in Salesforce.
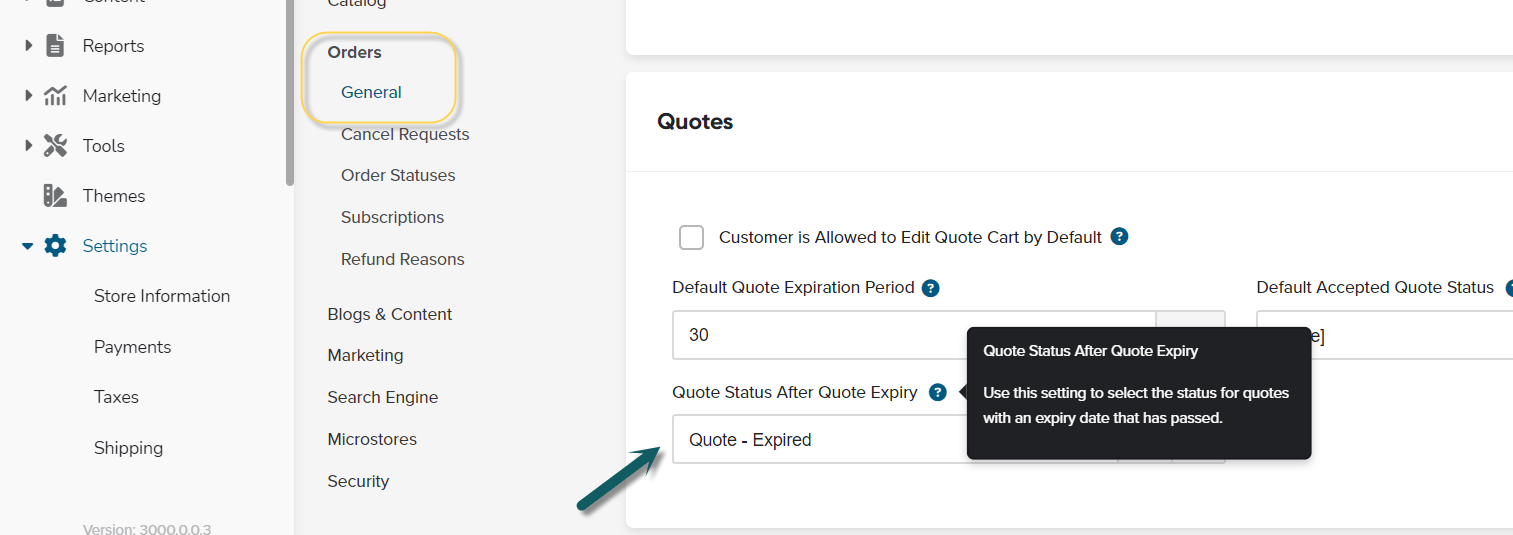
- Quote Expiration/Cancelation:When a quote is canceled or expired, the opportunity status updates in Salesforce.
- Salesforce Order Editor:We've added clickable links in the order editor so you can jump straight to your Salesforce orders and customer records for a seamless experience.
SPS Commerce:
Our SPSCommerce integration allows you to effortlessly sync purchase orders between SPSCommerce and your storefront, either manually or automatically. SPSCommerce integration is free for all Enterprise and above plan levels.
- Sync Purchase Orders from SPSCommerce:You can quickly accept or reject purchase orders from your storefront.
- Shipping Updates to SPSCommerce:When you ship out items in storefront, we send shipping updates to SPSCommerce automatically.
- Create Invoice in SPSCommerce:you can setup to create invoice in SPSCommerce from storefront.
Algolia:
- Index Improvement:We've supercharged our native Algolia integration with fresh attribute fields including sale price, descriptions, stock status, product flags, and previous item numbers. We've also enhanced category handling with full parent hierarchies and smarter multistore filtering for an even smoother B2B commerce experience.
- Integration Improvement:We've upgraded our Algolia integration so that when you search or click the icon in the autocomplete widget, you'll be forwarded to a URL of your choice with your query intact—and you can now enable InstantSearch in our app settings to automatically generate a customizable results page.
- Catalog Sync:We've fine-tuned our Algolia catalog queries for a faster, smoother sync on our B2B Commerce Platform.
Email Template Improvements:
- Default Email Settings & Widget:We've rolled out refreshed default email settings and new email widgets. Plus, it’s loaded with default content and 9 pre-built email templates to get you started even faster.
MFA for Customer Logins:
We've rolled out Multi-Factor Authentication (MFA) for customer logins, just like for admins. Now, customers can verify their identity via email or text for added security.
FEATURE IMPROVEMENTS
- Block by Geo location:We are now including visitor’s geo info to the session and let you easily set up rules for blocking traffic from specific regions, giving you even more freedom to tailor your store’s experience.

- Reward Points Page Tweaks:We've fine-tuned our Reward Points pages on both the My Account and Admin sides by moving navigation links to the bottom of the grid and relocating the Manage Reward Points button into a collapsible header. We also fixed a pesky bug that was causing scrambled data when navigating between grids.
- Improved Customer Search:We've fine-tuned our search on the Customers and Orders lists so that whether you type FirstName LastName or LastName, FirstName you’ll easily find matching records and enjoy a smoother experience on our platform.
- Ship To Customer Search Upgrade:We've revamped our orders list so you can now easily search for ship-to customer names using either first last or last first input, making it easy to find the orders you need.
- Time Since Field Updates:We've now added support for TIME SINCE conditions on store level custom fields just like the ones on customer level, and you can also trigger customer events using a time since date-based store custom field.
- Mass Product Editor:Easily update variant inventory details like ItemNumber, stock, and product status all at once.
- Shipping Label:We’ve added shipping label history so you can easily review past labels, and you can now pay your account balance directly from the platform.
- Enhanced Search Insights:You can track your search history, even the times when no results come up. This update gives you extra insights to fine tune your experience on our B2B commerce platform.
- Multiple Store Export Selections:When customizing a customer's data export, you can now select several stores or even all of them at once.
- Option to Hide Support Chat:You can toggle off the support chat to keep your admin area clutter-free.
- Free Subscription Credit Authorization:Streamline how you access and manage your subscription credits. You can authorize an amount on free subscription as credit card verification, ensuring a secure and hassle-free experience every time you subscribe.
- VeraCore Shipping Sync Option:We’ve enhanced our VeraCore integration to automatically skip non-shipping items.
BUG FIXES
- Smooth Visitor Sessions:We've fixed a glitch where clearing filters on visitor sessions would sometimes cause a temporary lag in updates.
- Avalara Performance Boost:We've resolved Avalara timeout issues that were slowing down admin tasks and affecting checkout times.
- Avalara Tax Commit Fix:We've fixed an issue with our Avalara Tax plugin. Orders now properly commit tax when paid, shipped or closed.
- Price Calculator Import:We fixed a bug with the Price Calculator Import so that when you’re using the Specified Base Price option, the 'Specify Base Price' field now updates just as it should.
- Wishlist Fixed:We've fixed a glitch where deleted wish list items were causing unexpected issues, so everything now runs smoother.
- Tax Display Fix:We've squashed a bug in the admin order editor that was messing up tax displays when shipping discounts were applied.
- Guest Account Issue Fixed:We fixed guest accounts issue when store requires login.
new
Marketplace Management
MCM Release Notes 2.18.25
Updates
- Clients can now request that their MCM + Jazz integrations add prefixes or suffixes to Order Numbers imported from sales channels into Jazz. This allows for additional business logic, such as routing only marketplace orders into an ERP.
- We have subscribed to Amazon's Pricing Health notifications, enabling us to receive immediate alerts when there is an issue with a price adjustment on an active offer. One key data point in these notifications is the Competitive Price Threshold, which represents the highest price an offer can have while remaining competitive. Exceeding this threshold typically results in Buy Box suppression. For listings using Buy Box pricing strategies, we now incorporate this competitive price into our repricing strategies and will not price listings above this threshold.
- In addition to Pricing Health notifications, we have subscribed to Amazon's Content Change notifications, which alert us to product content updates. While we are internally monitoring these notifications, we are also working on future features to help track content changes. In the meantime, we continue to track product content changes over time based on periodic product downloads. You can review these changes in our content change report.
- When enabling order exports for Shopify, you can now choose which parts of a bundle/kit to export. This is useful if your fulfillment workflows start in Shopify and only require shipping solutions to recognize either the component SKUs or the bundle SKUs, preventing overshipping.

Bug Fixes
- For clients fulfilling orders across multiple FBA regions, the Dynamic Minimum price calculation was incorrectly using the same Amazon fees for all FBA regions. This has been fixed to apply the correct regional fees.
- Another update was made to the Dynamic Minimum price calculation. Previously, when an item was in stock on FBA, the minimum price was based on FBA fees. However, when the item went out of stock, the calculation defaulted to using the fulfillment cost of the primary warehouse, often resulting in a lower-than-expected Dynamic Minimum price. With this update, FBA fees will continue to be used for items that have historically been sold through FBA—except when they are explicitly configured to convert to merchant fulfillment upon selling out.
- We now pull in seller discount amounts for TikTok orders. The sum of all discounts on an order (set by the seller and/or TikTok platform) will be displayed on the "Discount Total" field.
new
Marketplace Management
MCM Release Notes 12.11.24
Updates
Filter product export by property requirement level
When exporting a product properties file, you can now filter down which columns should be included based on the property requirement level. This is especially useful if you're listing new products in bulk and just want to focus on filling out the required properties. 
Variation product management improvements
- We've added a column for variation title to the variant grid to aid in populating option values if they didn't import from a catalog.

- You can now set the product ID type of all of your variants at once vs. having to set them individually per SKU per product ID type. To do so, select the SKUs, click Bulk Actions > Assign product ID type, then select the relevant types. You can also use these bulk actions to remove SKUs from a variation set in bulk.

- Lastly, we've updated the available option list for Ebay to be more exhaustive. This will help prevent cases where no variant option is available due to the listing channels not sharing the same options.
Load More
→