Changelog
Follow up on the latest improvements and updates.
RSS
new
Storefront
Storefront Release Notes for 2026.2
Storefront 2026.2 introduces major enhancements for B2B commerce, customer personalization, merchandising flexibility, and performance. This release delivers a more collaborative quoting experience, smarter customer-specific controls, and a wide range of platform improvements across storefront and admin.
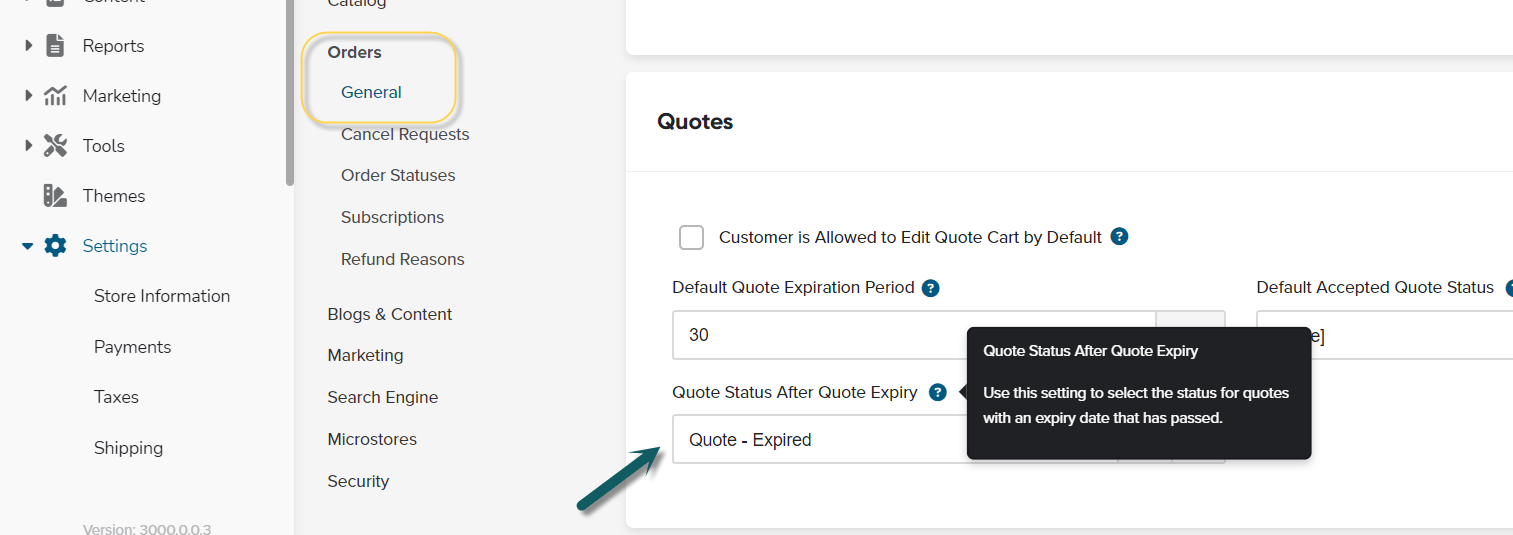
Quotes, End-to-End
Quoting is now fully integrated across both storefront and admin, making it easier for buyers and sales teams to collaborate without leaving the platform.
- Create Quotes directly from the shopping cart to turn active carts into formal quote requests
- Create Quotes from Wishlist for faster saved-item conversions
- New My Account Quotes section gives customers visibility into all quote activity
- Customers can edit and resubmit quotes directly from My Account
- Admin Edit Quote functionality enables sales teams to review, modify, approve, and respond to quotes from the back office
For a full walkthrough, check out the knowledge base article here: https://support.americommerce.com/hc/en-us/articles/48520103673755-Creating-and-Managing-Front-End-Quotes
Smarter B2B & Customer Experiences
Deliver more tailored buying experiences with expanded customer-type controls and personalization options.
- Customer-Type Specific Minimum Order Amounts for retail, wholesale, distributor, and custom customer groups
- Storefront personalization visibility controls by store and customer type
- Reset Password URL support for customer SSO flows, allowing account recovery without interrupting single sign-on authentication
Better Merchandising & Product Management
New merchandising tools make product setup, pricing configuration, and product discovery more flexible.
- Clone Price Calculators from existing configurations to accelerate setup
- Manufacturer and Category support within Price Calculators for more advanced pricing logic
- Custom Fields for Variants to support extended product data
- Additional variant inventory options for more customized information
- Product search improvements prioritize SKU and product-name prefix matches for more accurate results
- Slideshow Widget Play/Pause controls for improved storefront media interaction
- Avalara Tax refund support for improved tax reconciliation workflows
Security, Speed & Performance
We’ve introduced a range of storefront improvements focused on performance, consistency, and accessibility
- Performance improvements across Category, Search, Attribute, and Widget pages, along with additional backend optimizations
- Faster, higher-quality image resizing with improved cross-format consistency
- Expanded storefront accessibility improvements
- Fixed an issue affecting USPS Ground Advantage rating calculations
new
Storefront
Storefront Release Notes for 2026.1
We’re excited to announce a powerful new release packed with enhancements designed to make your experience
simpler, faster, and more flexible
- whether you’re managing B2B customers, running reports, or optimizing day-to-day operations.Smarter B2B & Customer Experiences
Managing teams and accounts just got easier. Our enhanced
B2B portal
now gives store more control including:• Expanded
manager permissions
to allow reassignment of employees• Employees can now
associate themselves with a manager
• New setting allowing employees to
use their manager’s store location
Customers will enjoy a more convenient experience with:
•
Reward points displayed as dollar values
for clearer savings• A new
guest gift card balance lookup
•
Payment links
directly on customer order list and statements pageBetter Merchandising & Product Management
We’ve added tools to help you move faster and sell smarter:
•
Clone products
wizard to help you quickly build or expand your catalog• More powerful
price calculator rules
, now including manufacturer and primary category• Personalization options that can be
hidden by store or customer type
• Improved phone number formatting including country code
Deeper Insights & Reporting
Make better decisions with clearer data:
• Run a
Zero Sales Report
to spot missed opportunities•
Email delivery reports
for more insights • Track
inventory sold
for improved inventory planningSecurity, Speed & Performance Improvements
Behind the scenes, we’ve made major upgrades to keep your platform fast and secure:
• New
Content Security Policy (CSP)
configuration options• Faster admin performance, even with large numbers of stores
• Improved product search speed
• Optimized loading with preconnected and preloaded JavaScript and CSS to boost Core Web Vitals
More Powerful Integrations:
•
Zip Tax
integration added•
Avalara Tax and TaxCloud
can be configured to commit tax based on paid and order status•
Network Merchants
payment gateway now supports ACH•
QuickBooks Online
enhancements, including:- Deposit account support
- Invoice class syncing
- Taxes synced as line item
• Improved
Fishbowl integration
to sync order with prefixQuality Improvements & Bug Fixes
We’ve also addressed a wide range of fixes and usability improvements, including:
• Improved discount sorting and filtering by date and status
• Store location import/export support
• View-only customer type
• Configurable refund reason ordering
• Rule engine support for customer external numbers
• Automatic ad-code expiration controls
• A new “like” button to product display widget
• Improved variant handling for pricing and images
• Resolved caching issues on product and carousel displays
• Fixed cart layout issues when removing items
new
Storefront
Storefront Release Notes for 2025.3
We’ve been busy improving your experience! This update introduces exciting new features, smoother integrations, and a variety of enhancements to make managing your store easier than ever.
✨ New Features
•
Track Your Email Delivery Status
– We’ve added powerful new insights to help you understand how your emails are performing! You can now see detailed delivery statuses for emails sent to your customers — including whether an email was:- Delivered – Successfully reached your customer’s inbox
- Opened – Opened by your customer
- Bounced – Could not be delivered
- Marked as Spam – Flagged by the recipient’s email system
You can view email delivery insights in three places:
- Email Templates Page: See the overall delivery status across all your email templates.
- Individual Email Template Page: Track how each template is performing.

- Customer Email History Page: View delivery and engagement status for every email sent to a specific customer.

•
Automatic Reward Points and Gift Certificates
– Easily send reward points and gift certificates to customers based on your rules or promotions. This rules can automatically apply to customers based on whatever frequency you deem fit (days, months, years) and can be segmented by Store and Customer Type. No more complex rule engine actions! 
•
Category-Specific Gift Certificates
– Limit gift certificates to selected product categories for more targeted rewards.
•
Generate Gift Certificates for Multiple Customers
– Generated and assign gift certificates to multiple customers in one step.•
Upsell Discounts
– Offer percentage-based discounts on upsell products.
•
Nuvei ACH Payments
– Nuvei payment gateway now supports ACH payments for added convenience.•
Store Testimonials
– Upload multiple images per testimonial to showcase more customer stories.•
Back-in-Stock Alerts
– Automatically notify customers when back-ordered products return.•
SFTP Exports
– Scheduled exports now support custom ports for easier setup.🔗 Integration Updates
•
FedEx Ground Economy
– Added support for FedEx Ground Economy (formerly SmartPost).•
CyberSource
– Updated to the latest API for better performance and reliability.•
Amazon SMS (MFA)
– Added support for Amazon’s SMS service for customer two-factor authentication.•
Klaviyo
– You can now send resized images in marketing emails for faster load times.•
Signifyd
– Fraud protection now supports store pickup orders.•
QuickBooks Online
– Choose whether to sync orders as invoices or sales receipts on a per-order basis.🛠️ Fixes & Enhancements
• Refund reward points applied as discounts when order is canceled.
• Customers can now purchase subscriptions while registering during checkout.
• Improved Quick Order performance.
• Resolved several minor issues with the HTML editor.
• Fixed custom payments not showing correctly in the order editor.
• Added order salesperson and due date to the order list and import/export.
• Fixed increase/decrease quantity issue in cart when use multiple-quantity feature.
• Resolved issue with child items inactive by store and customer type.
• Fixed order balance updates when process payment order.
new
Storefront
Release Notes for 2025.2
We’re excited to share the latest updates packed with powerful new features, performance enhancements, and new integrations to improve your workflow and customer experience.
NEW FEATURES
New Personalization Options:
We’ve expanded our personalization features to give you more flexibility when configuring your products. You can now choose from the following input types: Textbox, Textbox with Confirmation, Upload, Dropdown, Phone Number, Data Picker, and Email Address. These new options make it easier to tailor your product experience for your customers’ needs.

Email Tracking in Customer Email History
We’ve enhanced email tracking to keep you better informed. Now, whenever an email is delivered, bounced, or opened, the status will automatically update in the customer’s email history—giving you clearer visibility into communication activity.

B2B Portal Enhancements
We’ve made several updates to improve your experience and streamline management tasks:
- Reward Points Management:Managers can now directly add or remove reward points for employees.
- Enhanced Reporting:Product status is now included in both the Company Reports and Product Inventory Report.
- Order Approval Simplified:Managers can now approve entire orders or item by item directly from the My Account section.
Smarter Shipping Estimates with Geo Location
You can now estimate shipping costs using the visitor’s
Geo location based on their IP address
—available on both the Shopping Cart and Estimate Shipping pages. We’ve introduced new merge codes for visitor’s Geo location data:
- ##SESSIONCOUNTRY##
- ##SESSIONSTATE##
- ##SESSIONCITY##
- ##SESSIONPOSTALCODE##
These enhancements help provide more accurate shipping estimates with less effort from your customers.

FEATURE IMPROVEMENTS
We’ve rolled out several enhancements to improve performance, usability, and flexibility across the platform:
Shipping Provider API Updates
Updated FedEx, UPS, and USPS integrations to the latest API versions for improved reliability and compatibility.
HTML Editor Upgrade
Our HTML editor now includes the latest improvements for a smoother and more powerful editing experience.
Widget Scheduling
You can now schedule widgets to display on specific dates—perfect for time-sensitive promotions or seasonal content.
"Notify Me" on Category Pages
The "Notify Me When Back in Stock" feature is now available directly on category pages for easier access.
Inherited Products into Subcategories
New option to automatically display products from a parent category in all its subcategories.
Low Stock Notification Settings
Configure low stock alerts to trigger only once when inventory drops below your defined threshold.
Saved Search Text on Apps & Add-ons Page
Your last search term is now saved, helping you find apps and add-ons faster.
Customer Saved Carts in Admin
View customers’ saved carts directly from the Admin > Orders > Carts page for better insight and support.
NEW INTEGRATIONS
Fishbowl Inventory

We’re excited to introduce Fishbowl Advanced Inventory Integration to automate your inventory workflows, helping you streamline operations and improve accuracy.
With this integration, you can:
- Sync orders seamlessly from your Storefront to Fishbowl.
- Sync inventory and shipment data from Fishbowl back to your Storefront.
Dillon Gage Integration

We’ve added support for Dillon Gage, a leading precious metals trading platform, to streamline your operations:
- Sync Products: Import products directly from Dillon Gage to your storefront.
- Real-Time Pricing: Automatically check live pricing from Dillon Gage when customers place orders.
- Order Sync: Send orders from your storefront to Dillon Gage after checkout.
- Status & Tracking Updates: Sync order statuses and tracking numbers from Dillon Gage back to your storefront.
This integration ensures accurate pricing, efficient order handling, and seamless communication between your storefront and Dillon Gage.
BUG FIXES
- Fixed an issue where changing quantity in the mini cart caused the shopping cart to close unexpectedly.
- Resolved a bug with decreasing item quantity in the cart when quantity multiples were enabled.
- Corrected UPS SurePost rate calculation for carts under 1 lb.
- Fixed an issue where the variant MSRP price didn’t update on the catalog page when switching variants.
- Addressed a personalization issue with child items when adding kits to the cart.
- Resolved a bug where Apple Pay occasionally failed to populate the state field.
- Fixed the product display widget not updating with the correct variant image and price.
- Corrected a reward points refund issue.
- Fixed a discount bug related to “Category in Cart Including Subcategories.”
- Resolved an issue where personalization strings containing the | character caused errors.
We heard you loud and clear—geolocation-based traffic blocking is here! This highly requested feature gives you even more control over your storefront, letting you fine-tune who can access your site based on region.
Now, you can easily set up traffic firewall rules to block visitors from specific locations right from your admin. Whether you need to keep certain regions out for security, compliance, or business reasons, we’ve made it simple.
Where to Find It: Settings > Security > Traffic Firewall

What’s New?
- Block by Geo Location– Set rules to block traffic from specific regions.
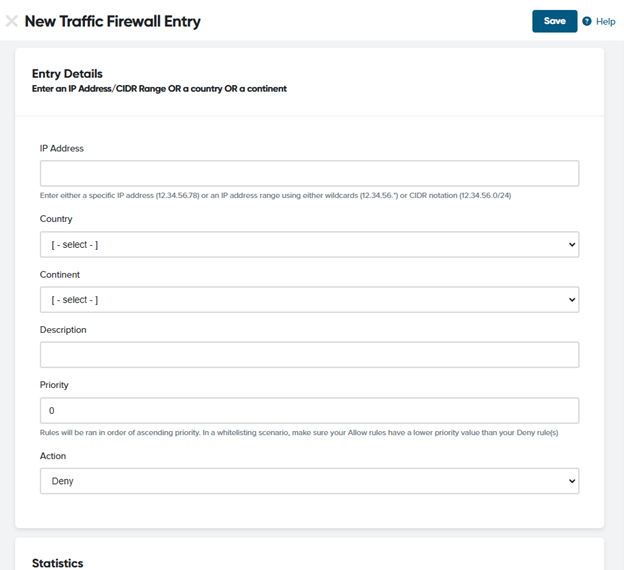
- IP Blacklist– Block individual IPs or entire ranges using wildcards.
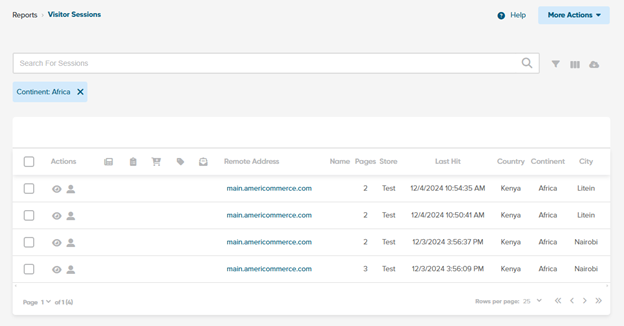
- Geolocation Insights– Visitor geo info is now saved in the visitor’s session and fully searchable. Go toReports > Visitors Session.

- Dashboard Updates– New widgets to track top countries, top continents, and top cities for deeper traffic insights have been added to the Traffic tab in the dashboard.

- One-Click Blocking– Quickly block regions or visitors directly from the visitor sessions list or active countries list.
Visitors Session:

Active Countries:

- Enhanced Filtering & Searching– Easily manage and monitor blocked traffic in the traffic firewall page (traffic blacklist).

This update puts more power in your hands, making it easier to secure and optimize your store’s traffic. Whether you’re preventing fraud, managing regional restrictions, or simply fine-tuning your audience, this feature gives you the flexibility you need.
For a full walkthrough, check out the knowledge base article here: https://support.americommerce.com/hc/en-us/articles/34566940226971-Review-and-Block-Traffic-by-Country
If you’re ready to take control, head to
Settings > Security > Traffic Firewall
to set up your geo-blocking rules now!We’re starting the year strong with powerful new features and game-changing improvements. Customize your dashboard with new widgets, streamline B2B payments and orders, enhance search with Algolia, and take advantage of the Salesforce integration. Plus, we’ve boosted security, refined order management, and made your storefront even better!
NEW FEATURES
New Dashboard Widgets:
Check out our new dashboard widgets, making all your key metrics super easy to access. Using the drop-down menu, you can smoothly switch between dashboards like Sales, Traffic, Marketing, or Products—where you’ll find everything from your top-selling products and sales trends to revenue breakdowns and shipping insights.
You’ll also have the flexibility to customize your dashboard by toggling between detailed traffic analytics, store sales overviews, rewards status, and top page views. Plus, with the widget selector, it’s simple to add or remove widgets to create the dashboard that fits just right. It’s a straightforward, user-friendly way to stay on top of your metrics and drive your business forward.
Below, we’ve provided some additional details on select widgets to help maximize your dashboard’s potential.
- Top Products Widget:We’ve added a new Top Products widget that highlights your top 5 best-selling items at a glance in the Products tab.

- Store Sales Overview:Easily track your sales from today, this week, or even the past few years; all in one place.

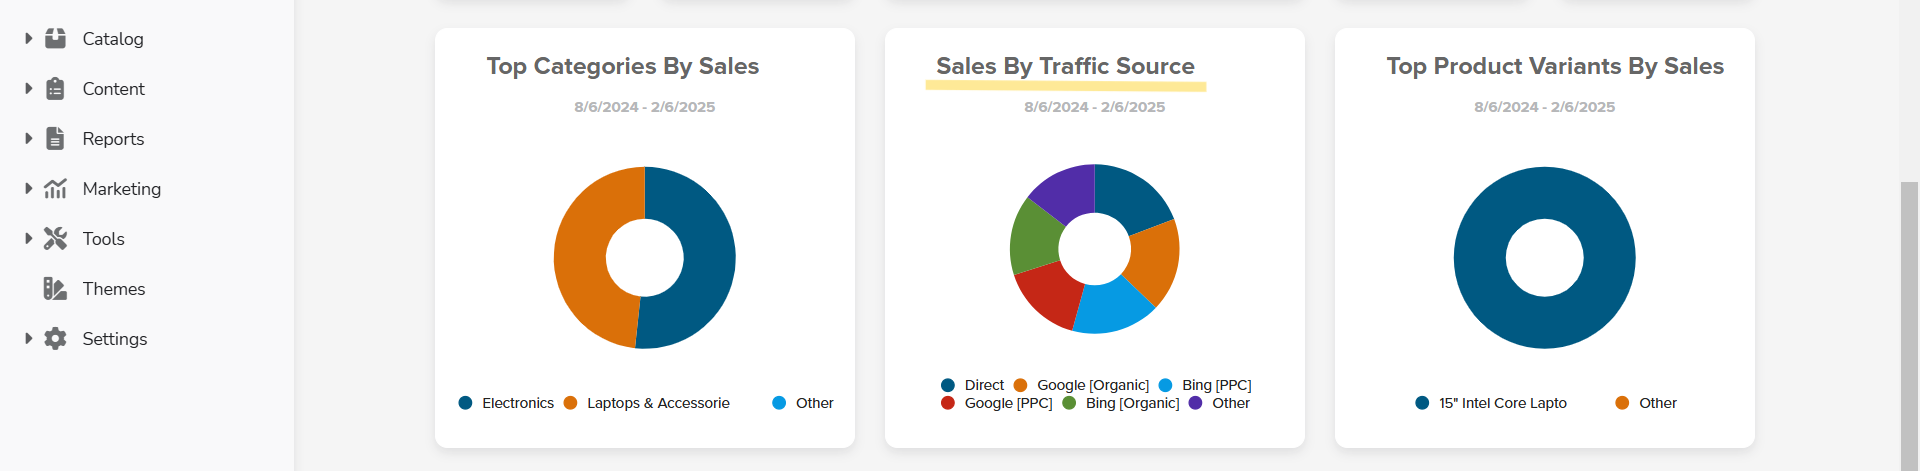
- Sales by Traffic Source Widget:You can easily track where your sales are coming from through the sales tab.
- Page Views Widget:Check out the new top Page Views widget under the Traffic tab in your dashboard.

- Top Shipping Methods:The top Shipping Methods widget is now available under the Shipping tab in your dashboard. Easily see your most-used shipping methods to streamline your fulfillment process.
- Rewards Point Overview:In the Rewards tab of your dashboard, you can quickly check expiring points, points earned this month, total products purchased with points, and more.

B2B Portal:
We've rolled out some cool updates to our B2B Portal that make it easier for everyone to stay in the loop and handle payments. These changes are all about making teamwork smoother and more laid back while keeping things running efficiently.
- Order Email Copy Settings:Now you can automatically send company copies of all order emails, keeping your entire team informed of every transaction. Plus, administrators now receive copies of every order emails as well.

- Shared Credit Cards:We've added a new setting for shared company credit cards. Now, employees can choose from the company’s credit cards during checkout, while admins can add, delete, or update these credit cards.
- Custom Field Enhancements:Easily add and edit custom fields for agent and employee profiles. Plus, we've made it possible to mark specific customer custom fields as editable.
- Employee Reward History:Click on an employee’s profile from either the user manager or company page, and you'll instantly see their complete reward point history right on the front end.

- Employee Default Customer Type:We set a default customer type for employee accounts on the B2B portal.
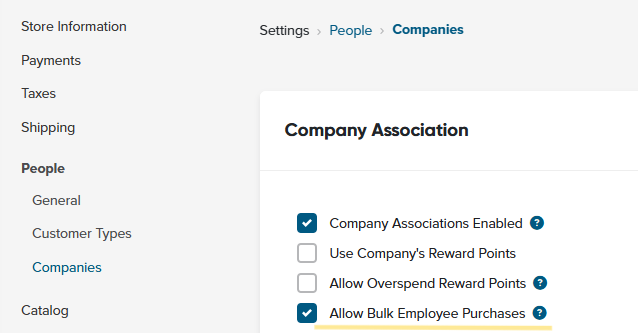
Bulk Ordering on behalf of Employees:
We've refreshed the PDP with a cool new drop-down that pulls Employee IDs from your customer hierarchy, so when you tag items, they're linked to the right person. Plus, you can easily toggle the bulk purchase feature on or off to suit your team's needs.
- Employee Custom Fields on PDP:We've made it easier to order on behalf of your team—now when you select an employee on the product page, their custom details (like sizing info) load automatically.

- Employee Selection on Order Edit:We've updated our order editor to update employee selection on order item.
- Employee Order Selections:We've refreshed our B2B portal so that when available, employee selections for individual order items now show up right in your order list, making order management smoother.
- Employee Order Reports:Filter and generate order reports for specific employees, with admin printouts now automatically grouping employee-tagged items together for easier tracking.
- Streamlined Order Emails:We've upgraded our order emails to automatically group items by employee ID, and now you can easily send emails just for a specific employee using our new admin tool.
- Employee Edit:Edit employee details on the shipping cart and wish list pages.
- Employee Selection:Choose an employee when moving items from your wish list to your cart.
- Share Your Wishlist with Your Team:Easily share your wish list with any sub-account in your company's hierarchy, so everyone stays on the same page.
- Accounts For Browsing & Wish List’s:You can create account types allowing users to browse and build wish lists without placing orders, perfect for customers who prefer to just explore.
Salesforce - Quote to Opportunity Integration:
- Sync New Quote:We've streamlined things so that every quote created on Cart.com now effortlessly transforms into a Salesforce opportunity. Complete with line items and status mappings for a smooth, one-way sync from your storefront to Salesforce.

- Quote Update:When quotes are updated in Cart.com, we automatically update your opportunities in Salesforce, including shipping details, fees, line items, and quote statuses.
- Covert To Order:When quotes turn into orders (whether on the front-end or backend), they automatically update to accept and link with their related opportunities in Salesforce.
- Quote Expiration/Cancelation:When a quote is canceled or expired, the opportunity status updates in Salesforce.
- Salesforce Order Editor:We've added clickable links in the order editor so you can jump straight to your Salesforce orders and customer records for a seamless experience.
SPS Commerce:
Our SPSCommerce integration allows you to effortlessly sync purchase orders between SPSCommerce and your storefront, either manually or automatically. SPSCommerce integration is free for all Enterprise and above plan levels.
- Sync Purchase Orders from SPSCommerce:You can quickly accept or reject purchase orders from your storefront.
- Shipping Updates to SPSCommerce:When you ship out items in storefront, we send shipping updates to SPSCommerce automatically.
- Create Invoice in SPSCommerce:you can setup to create invoice in SPSCommerce from storefront.
Algolia:
- Index Improvement:We've supercharged our native Algolia integration with fresh attribute fields including sale price, descriptions, stock status, product flags, and previous item numbers. We've also enhanced category handling with full parent hierarchies and smarter multistore filtering for an even smoother B2B commerce experience.
- Integration Improvement:We've upgraded our Algolia integration so that when you search or click the icon in the autocomplete widget, you'll be forwarded to a URL of your choice with your query intact—and you can now enable InstantSearch in our app settings to automatically generate a customizable results page.
- Catalog Sync:We've fine-tuned our Algolia catalog queries for a faster, smoother sync on our B2B Commerce Platform.
Email Template Improvements:
- Default Email Settings & Widget:We've rolled out refreshed default email settings and new email widgets. Plus, it’s loaded with default content and 9 pre-built email templates to get you started even faster.
MFA for Customer Logins:
We've rolled out Multi-Factor Authentication (MFA) for customer logins, just like for admins. Now, customers can verify their identity via email or text for added security.
FEATURE IMPROVEMENTS
- Block by Geo location:We are now including visitor’s geo info to the session and let you easily set up rules for blocking traffic from specific regions, giving you even more freedom to tailor your store’s experience.

- Reward Points Page Tweaks:We've fine-tuned our Reward Points pages on both the My Account and Admin sides by moving navigation links to the bottom of the grid and relocating the Manage Reward Points button into a collapsible header. We also fixed a pesky bug that was causing scrambled data when navigating between grids.
- Improved Customer Search:We've fine-tuned our search on the Customers and Orders lists so that whether you type FirstName LastName or LastName, FirstName you’ll easily find matching records and enjoy a smoother experience on our platform.
- Ship To Customer Search Upgrade:We've revamped our orders list so you can now easily search for ship-to customer names using either first last or last first input, making it easy to find the orders you need.
- Time Since Field Updates:We've now added support for TIME SINCE conditions on store level custom fields just like the ones on customer level, and you can also trigger customer events using a time since date-based store custom field.
- Mass Product Editor:Easily update variant inventory details like ItemNumber, stock, and product status all at once.
- Shipping Label:We’ve added shipping label history so you can easily review past labels, and you can now pay your account balance directly from the platform.
- Enhanced Search Insights:You can track your search history, even the times when no results come up. This update gives you extra insights to fine tune your experience on our B2B commerce platform.
- Multiple Store Export Selections:When customizing a customer's data export, you can now select several stores or even all of them at once.
- Option to Hide Support Chat:You can toggle off the support chat to keep your admin area clutter-free.
- Free Subscription Credit Authorization:Streamline how you access and manage your subscription credits. You can authorize an amount on free subscription as credit card verification, ensuring a secure and hassle-free experience every time you subscribe.
- VeraCore Shipping Sync Option:We’ve enhanced our VeraCore integration to automatically skip non-shipping items.
BUG FIXES
- Smooth Visitor Sessions:We've fixed a glitch where clearing filters on visitor sessions would sometimes cause a temporary lag in updates.
- Avalara Performance Boost:We've resolved Avalara timeout issues that were slowing down admin tasks and affecting checkout times.
- Avalara Tax Commit Fix:We've fixed an issue with our Avalara Tax plugin. Orders now properly commit tax when paid, shipped or closed.
- Price Calculator Import:We fixed a bug with the Price Calculator Import so that when you’re using the Specified Base Price option, the 'Specify Base Price' field now updates just as it should.
- Wishlist Fixed:We've fixed a glitch where deleted wish list items were causing unexpected issues, so everything now runs smoother.
- Tax Display Fix:We've squashed a bug in the admin order editor that was messing up tax displays when shipping discounts were applied.
- Guest Account Issue Fixed:We fixed guest accounts issue when store requires login.
new
improved
Storefront
Product Flags Just Got Easier
We have made Product Flag (C1, C2, and C3) easier for you to display them on product images.
What Are Product Flags?
Product Flags are short, customizable labels that show up on your product images—ideal for calling attention to sales, new arrivals, or any other special features.

How to Customize Your Product Flags
- Go to Settings > Catalog > General > Product Flags.
- Enter your own custom label (e.g., “Sale,” “New,” “Limited Edition”).
- Save your changes.
- We introduce new ##PRODUCTFLAG1##, ##PRODUCTFLAG2## and ##PRODUCTFLAG3## merge codes to render these flags. To learn more about setting up Product Flags in your theme, visit this page.
Your new labels will appear immediately on the product images where those flags are activated.

Why You’ll Love This Update
- Simple to Customize: Update labels in just a few clicks—no coding needed.
- Instant Impact: Watch your product images grab attention as soon as you enable a flag.
new
Storefront
Copy & Customize Rules with the New Clone Function
We’re excited to introduce the new “Clone Rule” feature in the Rule Engine! This makes it easier to reuse existing rules for multiple stores. Instead of recreating each condition and action from the start, you can now simply duplicate a rule and fine-tune it as needed. This saves time, keeps your rules consistent and helps avoid errors.
How to Use It
- Access the Rule Engine:
- Log into your store’s backend.
- Go to:Tools > Power Features > Rule Engine > Customer Events.
- Clone a Rule from the List:
- In the Customer Eventssection, find the rule you want to copy.
- Click the Cloneicon next to it.
- You’ll get a complete copy of the original rule, including all conditions and actions.

- Clone from the Edit Screen:
- Prefer to edit first? Click thePencilicon to open the rule’s edit page.
- Once there, go to More Actions > Clone Rule.

- Customize Your New Rule:
- Open the cloned rule and adjust the conditions, triggers or actions as needed.
- Make store-specific changes, tweak discounts or add new conditions.
Example:
Say you have a rule in Store A that gives 100 rewards points for a customer’s birthday. For Store B, you want the same setup, but with 200 rewards points. Instead of building everything again, just clone the Store A rule and make those quick changes for Store B. In seconds, you’ll have a new rule ready to go.
Ready to Try It?
Log into your backend and head over to the Rule Engine to give cloning a try. You’ll find it makes managing rules across multiple stores simpler, faster and more accurate!
We’re excited to announce two new features that improve credit and billing management for companies:
Shared Company Credit Limits
and Secondary Billing Address Email
. These updates give companies more control and flexibility, creating a smoother experience for organizations managing multiple accounts.Shared Company Credit Limits
The Shared Credit Limit feature allows all accounts linked to a company to draw from a single credit limit, making it easier to track spending and manage outstanding balances.
Key Benefits:
- Centralized Credit Management:Linked accounts share one credit limit, simplifying credit tracking across multiple accounts.

- Flexible Override Options:Admins can set custom credit limits for individual accounts when needed, offering flexibility.
- Optimized for Company Associations:Perfect for companies with linked accounts, this feature centralizes credit control across all related accounts.
How It Works:
Enable the Shared Credit Limit feature in
Settings > People > Companies
. Once activated, orders using credit-linked payment methods draw from the company’s shared credit limit. This limit can also be customized at the individual account level if needed.For more information, refer to our knowledge base article on Shared Credit Limit to learn more.

Secondary Billing for Company Accounts
The Secondary Billing feature allows companies or their admins to add a second billing contact email. This ensures that billing communications reach multiple contacts, reducing missed invoices and improving documentation.
Key Benefits:
- Improved Communication:Adding a secondary email means critical billing information reaches more people within the organization.
- Admin Flexibility:Company admins can easily add or update the secondary billing email, managing contacts without needing support.
- Ideal for Larger Teams:This feature is especially helpful for companies with large teams, ensuring billing updates reach the right people.
How It Works:
Admins can add a secondary billing email in
Settings > People > Companies
within the company profile or through Customer > Customer List > Edit Customer
. Once set, billing communications will be sent to both the primary and secondary email addresses.
Summary
These new features—
Shared Credit Limits
and Secondary Billing for Company Accounts
—simplify credit and billing management, giving companies control over how credit is shared and how billing information is distributed. Together, they support smoother operations for businesses managing multiple accounts and contacts.new
Storefront
New Feature Alert: Store Pick Up Is Here!
Say hello to Store Pick Up, our latest rolled out feature, making it easy for customers to pick up their orders at a nearby store. With simple setup options and an optimized checkout experience, this new feature brings added convenience for both businesses and customers. Let’s dive in!
Quick Setup for Store Pick Up
Store Pick Up can be configured by navigating to
Settings > Shipping > General
under the Store Pickup Options section. Key settings include:- Enable Store Pickup:Activate this option to display store locations during checkout and when editing orders.
- Show Distance to Store:Display stores by proximity to customers. When disabled, stores will be sorted by name or custom order.
- Number of Store Locations to Show:Limit the number of store locations visible (set to 0 to show all).
- Distance Unit:Choose between miles or kilometers for distance (default: miles).
- Store Pickup Instructions:Add custom instructions for order confirmations and emails using the ##STOREPICKUPINSTRUCTIONS## merge code.

Custom Shipping Methods for Store Pick Up
Custom shipping methods can be created by navigating to
Settings > Shipping > Custom Shipping Methods
. Ensure the method is flagged as a Store Pickup Method so it only displays when store pickup is selected, hiding all other shipping options.Managing Orders with Store Pick Up
Easily manage orders with store pickup using the Store Location column in the order list (
Orders > Orders
). You can filter orders by store location using Advanced Search.On the order edit page (
Orders > Orders > Edit
), you can toggle between shipping and pickup. When store pickup is selected, a dropdown will appear to choose a store along with fields for the customer’s name and phone number.
All store pickup details are visible on the View Order page under the Store Pickup label, displaying the selected location.

Make Checkout a Smoother Experience
Enable Store Pick Up to ensure the store pick up option appears during checkout. If no shippable items or subscriptions are present, store pickup will be hidden. Only shipping methods marked as Store Pickup Method will be displayed when this option is selected.
Need to update the layout or merge codes? Use the HTML Editor under
Themes > Edit > Pages > Checkout and Order > One Page Checkout
to make the necessary changes.Using Custom Fields for Pickup Orders
Shipping-specific custom fields can be shown separately during checkout by enabling the “Show Shipping Custom Fields Separate From Shipping Address” setting under theme settings. This ensures only relevant information appears when pickup is selected.
Need More Help?
Activate Store Pick Up in your settings today and offer your customers more ways to shop! For additional setup details and best practices, refer to the Store Locations and Store Pickup knowledge base article for more information.
Load More
→